Thursday, December 28, 2023

A Hand-sewn Kilt!

 Years ago, when I lived in Salt Lake and was still working as a nanny, a friend from church commissioned me to make two kilts for him. I had never made a kilt in my life, but I felt that I was ready for the challenge. You can see my post about it here: Kilt Commission.

So many pleats! 

That was back in 2017, and since then, I haven't made any other kilts. 

Scott, a good family friend, who officiated at my brother's wedding, and has helped out my family a lot, has wanted a kilt for a long time. A few years back, as a thanks for all he's done, I promised him that I'd make him a kilt. He bought proper wool tartan in his family plaid, and I began it back when Nick and I lived in Idaho. When we moved and drove across the country, I packed it up and put it in our storage unit. I finally got it out again this past summer and finished the kilt! Long overdue!

Last time I really struggled with sewing on the leather buckles. This time it wasn't as big a chore as I was anticipating. 


Again, I used the pattern from Folkwear Patterns, and it turned out even better than before, I think. Having made two kilts previously was a huge help to me, and also, the photos and videos my sister Heather sent me of a kilt she has, that allowed me to see the insides, and a few points that I had forgotten. 

I finally finished it just before Halloween, and I'm so glad it turned out and that it looks good and fits properly! 

The first airing of the kilt. 


My friend Scott wore it to church on Christmas Eve, and I was able to get some more pictures of him wearing his kilt. I love the muted colors in this tartan - it's very pretty. 

A kilt on Christmas Eve. It was very nice to see it on Scott in person after working on it for so long. 


Although it came together well, I think it'll be a very long time again until I am tempted to sew another kilt! It takes a lot of work, and except for some of the lining pieces, it is all hand-sewn. 

A side-view, showing the fringe, the buckles and some of the pleats. 


Sunday, November 19, 2023

Learning to Weave

Many years ago, I bought a loom. I don't remember the particulars of how we got it home, but it somehow ended up in one of the rooms of my parents house, assembled but lying fallow. 

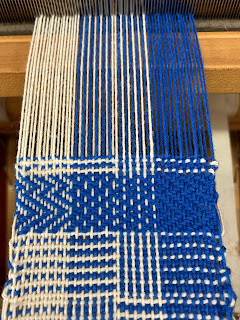
The first practice weaving we did in class.


Shortly after this, I moved to upstate NY to live with my sister Heather, and I didn't bring the loom with me. 

It eventually got dis-assembled, and I assumed I might never learn how to weave, though I wished to. 

It wasn't until I got married that I began to have hope. Nick would often mention weaving to me, and how exciting it would be to set up my loom someday. 

I still wasn't sure how this would ever happen, but then a local yarn shop, Heindselman's (which has been in business since 1904) offered a weaving class, and I signed up. It started in September. We did a couple of practice pieces, then selected materials for our final project! 

our second project.

I have recently finished my final project, and wore it today for the first time. 

setting up the loom is the hard part!


My teacher will be helping me set up the loom - again at my parents house - and she's also going to teach me how to weave overshot. So watch this space for a further post about weaving. Both Nick's great-great grandmother, my great-aunt and uncle on my dad's side, and my sister Heather used the overshot method, and I will be sharing more about that in my next post. 

working on my shawl


twisting the tassels at the end


Nick and I went out today to take pictures. It was such a beautiful, windy autumn day. Autumn has lingered all month, and I am so grateful for that. Winter is coming, and there was a hint of that in the cold breeze and the gray sky. But there are still so many trees full of their autumn glory, and it was beautiful to be out on such a beautiful day. 

Look at these yellow leaves!


A closer view of my shawl. 

Monday, June 19, 2023

Finished Project: a Victorian-inspired Sewing Box

My finished sewing box!


Last month, I wrote a post about being so inspired by Charlotte Bronte's sewing box, that I wanted to create one of my own.  I had started transforming a paint-it-yourself jewelry box into one of these sewing boxes. Most original ones are plain wood, or inlaid. There is a fabulous website, Hygra, that sells these boxes and lists photos and information about them. Before seeing their painted example, I decided that I would like to paint the top of my box. 


The beautiful painted box on the Hygra website, circa 1835.


I covered the inside trays with paper first, before painting or staining the box. Using skills I'd learned in book-making, it was an exciting beginning: 

The covered trays, filled with antique, vintage & reproduction sewing notions.

I don't paint, and I was nervous about doing so. Nick suggested different colors, and helped me mix them, but I painted most of it myself. 

But before even painting, he helped me to transfer my drawing onto the top of the box: 

Transfer paper, and my original image. I drew it on upside-down and had to re-do it! 

The image of the ruins was inspired by my visit many years ago to Finlaggan, on the Isle of Islay: 

From my visit to Finlaggan, when I lived in Scotland

I put a lady in my drawing, from the 1790s, using fashion plate from the time for her dress and Spencer Jacket: 

Costume Parisian from 1797

Nick shaded and darkened the painting for me, helping it look so wonderful. After painting it, we took the hardware off, and Nick stained it for me. Then I lined the bottom with the same paper I'd used for the trays inside. 

The top of the box, with the hardware back on.


A closeup of the painting.


The inside of the box, also stained, with the paper-covered trays, and the 
antique sewing notions within!

Original antique sewing boxes are much grander than mine, with special trays for the thimbles, ivory spindles and the like. Mine is a modest imitation, but I'm very proud of how it turned out! 

A better look at the inside of the box with the larger tray removed. 


Thursday, May 4, 2023

New Project: a Victorian-inspired Sewing Box

 I recently read a biography of the Bronte sisters that was both exciting and inspiring (you can read my thoughts about it on my Substack account here ). The book, called The Bronte Cabinet is a study of the Bronte sisters' through their objects. One of the things discussed in the book is Charlotte Bronte's sewing box. 

Inside her box are wonderful little treasures, such as measuring tapes (there are two, one inside a shell, the other in an acorn shape), threads, another acorn which houses a thimble, a pill box, ribbons and others items. 


Charlotte Bronte's sewing box, Bronte Parsonage Museum.

When Nick and I went to Hobby Lobby recently, I saw a jewelry box in their aisle of boxes to paint and when I looked inside, I realized it would make a great reproduction of a sewing box like the one above. 

I've looked up similar boxes, to see what they're like. They're made of wood, and while I'll stain the sides of my box, Nick is going to help me paint the top (I've been sketching out various scenes -- I haven't decided on one yet).

Some of the boxes I've seen even have mirrors in them, as my box does! 

This box, listed on Theriault's dates from around 1880. The lid has a mirror, and you can
see bone awls, a thimble and other items. 

I might try to put some fabric around the edges of the mirror, as is done in the above example. 

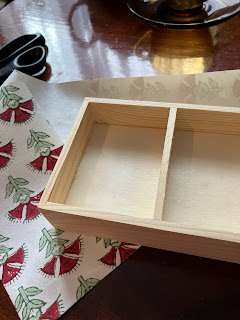
My soon-to-be sewing box!

I'm going to use some things I learned in book-making to line the little trays of my box. 

The paper I'm using to line the trays.


When it is finished, I have a lot of vintage and antique items I can put inside, most of which were inherited from Nick's grandma (whose house had items in it dating back to the 1880s at least!). 


An antique awl, thimbles, buttons, hooks & eyes, scissors & old thread (the big one is J.P. Coats, a company that began in Paisley, Scotland).


I'm very excited to start working on this. I'll line the trays first, then paint the top (maybe a scene similar to the one on my Bride Box, which I haven't posted about, so I'll include a photo below). 

My bride box - a large, hand-painted box used most likely for the wedding garments. 
Nick & I found this when we were in New York, and it probably dates from the 1830s
.


Then we'll finish by staining the sides. I'm glad I have a project to work on (I'll be having surgery soon & I hope I can work on things like this while I'm recovering) and I'm glad that Nick will help me with the painting and staining! 


Tuesday, January 3, 2023

A Dress for Naomi

 Last December, and again this past summer, Nick and I were able to spend some time with his sister Emily and her family. It's been delightful to meet all my in-laws and get to know my new nieces and nephews this past year.

In the autumn, I discovered that Naomi (one of Emily's daughters) loves history and old-fashioned dresses. A girl after my own heart! I offered to make an old-fashioned dress for her. I had some fabric on hand, and a lot of patterns, and had her choose which one she liked. 

The skirt & bodice were largely machine sewn, but a lot of the finishing was hand-sewn. 

The pattern she chose was an 1860s inspired pattern. This was a bit of a challenge for me, as I've never done 1860s, and with the exception of the 1830s dress and the 1780s dress I made several years ago, most of the historical clothing I make is 1910s, so not very much fabric or gathering. 
Ironing & pinning the pleats. 

With this dress, I was amazed by how much fabric can fit into a small waistband! No wonder many petticoats & crinolines were necessary in this decade. 

A lot of it was machine sewn, but a lot of it was hand-sewn as well, and I was able to use family heirlooms that I'd inherited this past summer. For example, I used ten black glass buttons (see my earlier post: Family Buttons). 

The fabric for the dress & for the bodice lining were both reproduction fabrics, the outer fabric circa 1880s, the inside 1840s or thereabouts. 

A closeup of the lace and the buttons. 


I also had a spool of lace that I'd inherited from Nick's family. I'm not that well-versed in lace, so I don't know how old it is, or if it was machine or hand-made. The last thing, which I don't have a picture of, was an old petticoat that I sent with the dress. It was really exciting to me to be able to send these old family heirlooms to Naomi to be part of the dress. 
I had some fabric from Nick's grandma that I used to line the hem with (the blue fabric shown). There's also a glimpse of the antique petticoat here. 

The cuffs on the dress, which also had lace. 

The finished dress.

When I was making my 1910s skirts, I made a few belts to go with them, using vintage ribbon I got from Harmony, a great local shop here in Provo. I had a belt buckle, also inherited with the old clothes, notions, etc. that I inherited from Nick's grandma, and though it's not as old as the 1860s, I thought it would be fun to make a belt to go with the dress, so I got some of that same lovely ribbon and made one. 

The dress with the belt.

I was so worried that it wouldn't fit, and even though it was late for her birthday, I hoped it would get there in time for Christmas. Miraculously, it only took two days to get from Utah to New York! 

Oh, good! It fits!

Here are a couple of closeup photos from Naomi as well: 


It makes such a difference seeing clothes on as opposed to just lying flat!


And another picture of Naomi in her dress. She looks so pretty!

The lovely Naomi in her dress.